Create Campaigns
How to create incentive campaigns using Merkl Studio
Merkl Studio is your command center to launch, manage, and optimize incentive campaigns. This guide walks you through the process of creating a campaign step by step.
All methods involve working with campaign configurations, whether you're using Studio templates, importing from an existing campaign, or building configurations from scratch.
Merkl Studio doesn't support all campaign types and customization options offered by Merkl. If you need features not available in the Studio or have questions, please reach out to us.
Step 1: Connect your wallet and start
Go to studio.merkl.xyz and click Connect to connect the wallet holding the reward tokens you want to distribute. Then click Create campaign to begin.
To see all supported chains, check the Status page.
Step 2: Set global parameters
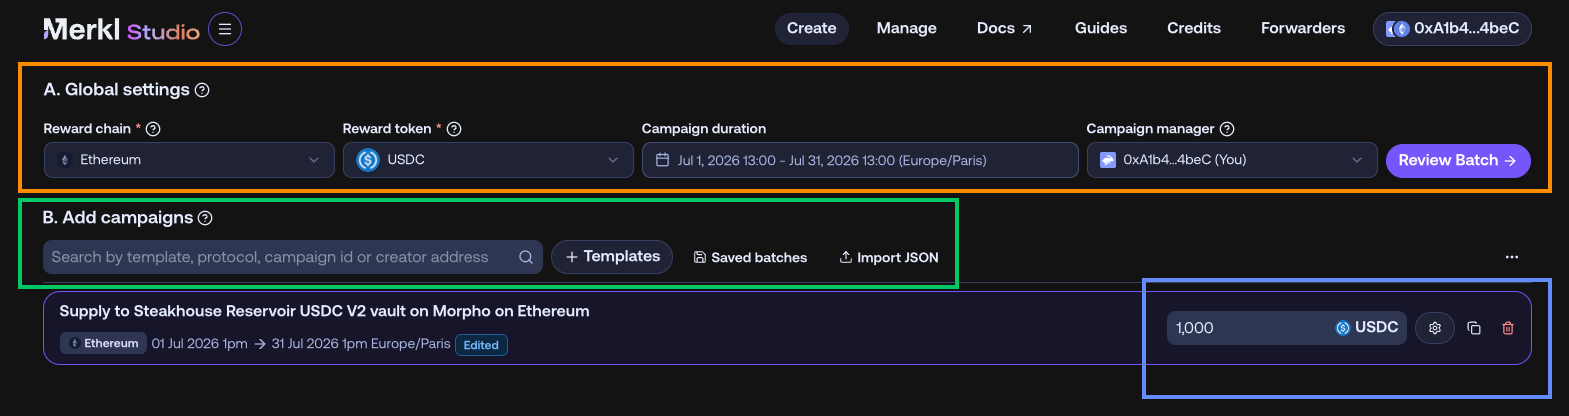
When creating a batch, certain parameters are shared across all campaigns:
Fixed parameters (cannot be modified per campaign):
- Reward chain: chain where rewards are distributed
- Reward token: token used for rewards across all campaigns. If your token is not yet whitelisted, fill out this form.
- Campaign manager: address managing the campaigns (defaults to your connected wallet). See best practices if you use a Safe.
Customizable parameters (can be overridden per campaign in Edit settings):
- Campaign dates: start and end timestamps can be customized individually for each campaign
Step 3: Add campaigns
Click + Templates to open the Template Marketplace. Browse by action type (Provide liquidity, Airdrop, Borrow, Lend, Hold token, Swap, Stake...) or search by template ID, protocol, or campaign name.
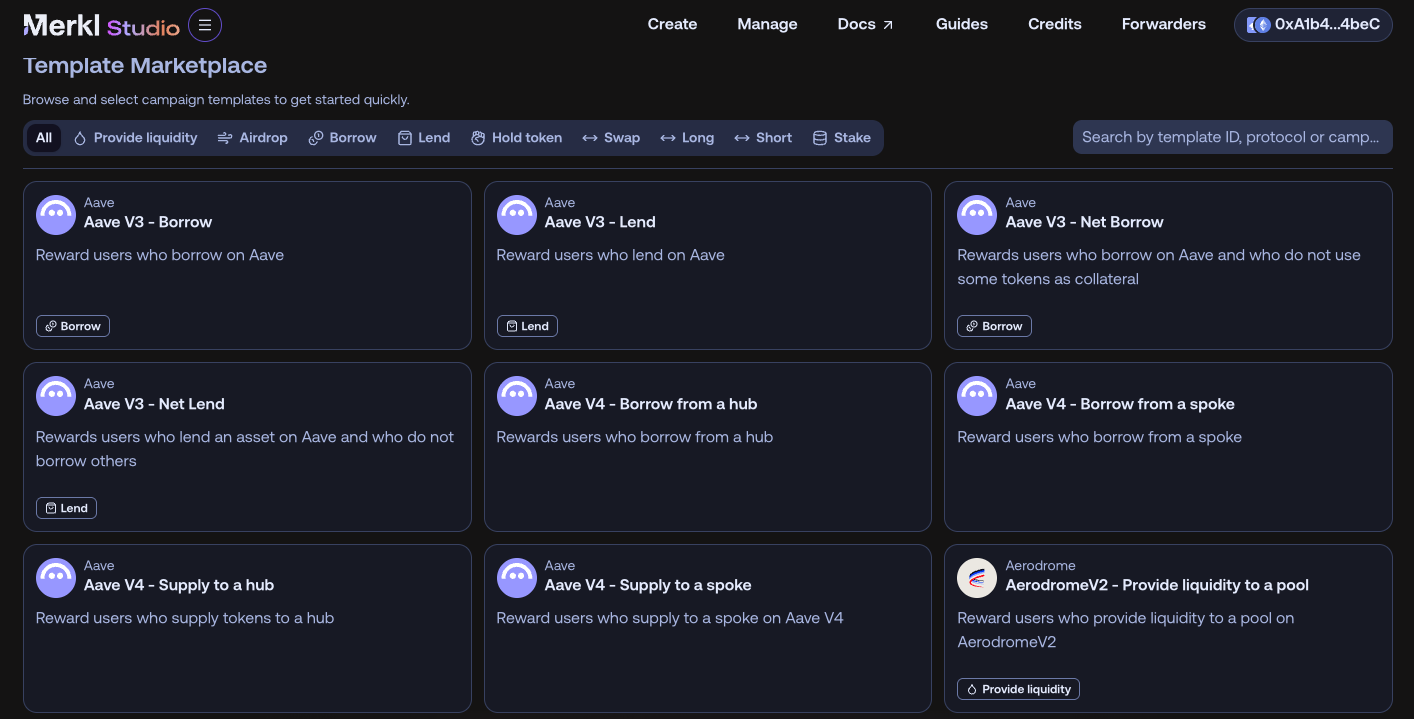
Available campaign categories:
- Provide liquidity: Uniswap, Curve, Balancer, and other DEX pools
- Lend / Borrow: Aave, Morpho, Euler, Compound...
- Hold token: any ERC20/4626 token, LP tokens...
- Airdrop: distribute to a predefined address list
- Swap / Long / Short / Stake: and more
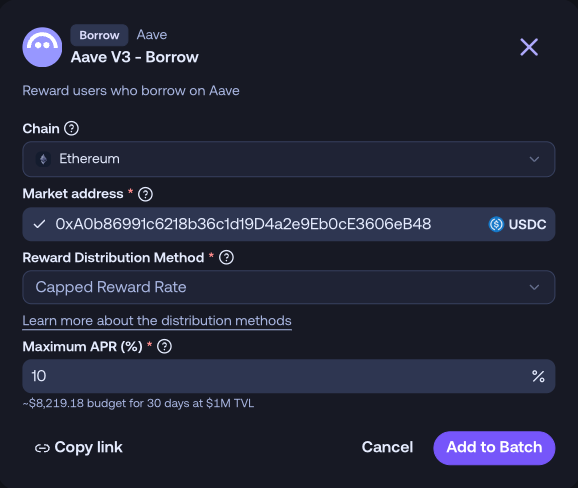
When you select a template, a popup appears with the protocol-specific required fields (chain, contract address, distribution method...). Fill them in and click Add to Batch. Once added, set the reward amount directly on the campaign card in the batch.
Beyond templates, you can also add campaigns by:
- Searching an existing campaign ID to duplicate a well-performing campaign
- Searching a creator address to reuse your own past campaigns
- Loading a Saved batch to restart from a previous configuration
- Importing a JSON file via Import batch
Merkl supports cross-chain campaigns — incentivize an asset on one chain while distributing rewards from another. See Cross-chain flexibility.
Step 4: Fine-tune (optional)
Once added to the batch, click the settings icon on the campaign card to open Campaign settings if you need to customize further: override dates per campaign, adjust the blacklist/whitelist, or add customization options.
For most campaigns, the template defaults are sufficient.
Use Simulate → to estimate the APR and required budget before saving.
Merkl sets a minimum distribution amount per hour for each reward token. If your total is too low (typically less than $1/hour), the campaign cannot be created.
Switch to JSON view to inspect or manually edit the full campaign configuration. Be careful — any mistake may corrupt the campaign configuration or make it invalid.
Step 5: Review and launch
Click Review Batch to verify your campaign details before launching:
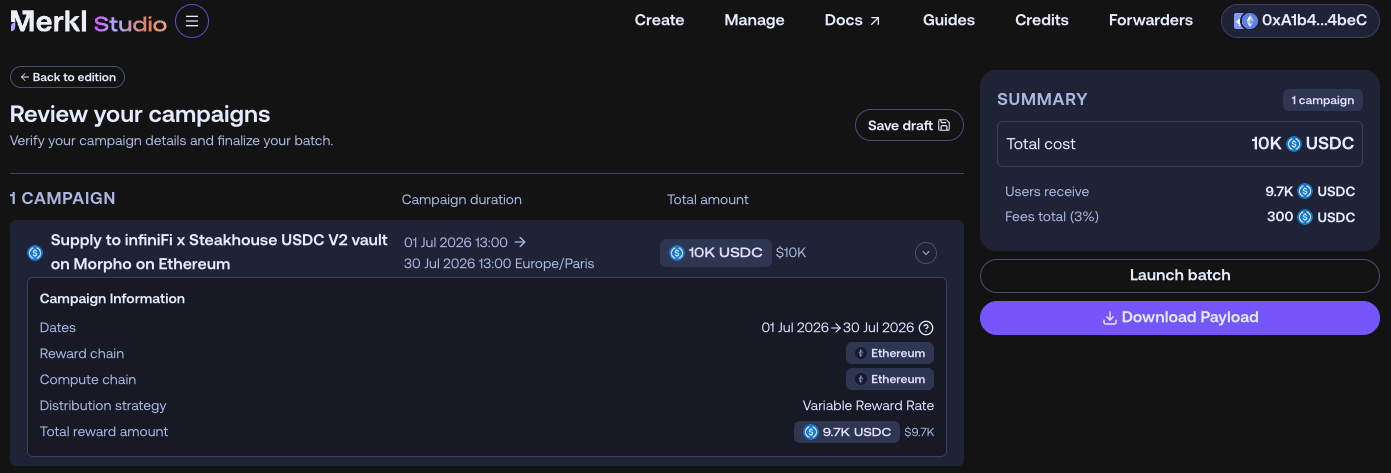
For each campaign in the batch, the review page displays:
- Total cost: total tokens to deposit (including the 3% distribution fee)
- Dates: campaign start and end timestamps
- Reward chain: chain where rewards are distributed
- Distribution strategy: reward distribution method selected for the campaign
Then choose your launch method:
- Safe / Multisig: Download Payload and follow the Create a Campaign from a Multisig or Gnosis Safe guide. If your Safe is set as Campaign Manager, the entire batch can be executed in just 2-3 transactions.
- EOA wallet: read and accept the Terms & Conditions, approve the token transfer, then sign to launch
You can also click Save draft at any point on the review page to save your batch and come back to it later.
You can also click Save draft at any point on the review page to save your batch and come back to it later.
Once submitted, your campaign may take up to one hour to appear on the frontend.
Best practices
- Use your Safe as Campaign Manager: if you use a Gnosis Safe, set it as the Campaign Manager in the global settings. This lets you execute the entire batch in 2-3 transactions instead of one per campaign, and gives your Safe full control over cancellations and parameter updates.
- Saved batches: save your batch at any point and pick it back up later using the Save draft button when reviewing your campaign, or reuse a previous configuration as a starting point for your next campaign.
- Batch size: keep batches under ~20 campaigns to avoid transaction size issues on most chains.
- Blacklists: when reusing a saved batch, review inherited blacklists and update them as needed.
Creating campaigns programmatically
For API-based campaign creation, see Crafting campaigns in our developer docs.